How to Clean an Insulated Bag Without Ruining It
You need to know how to clean an insulated bag before you put one into a food-service or medical program. Most insulated bags aren't machine washable. The insulation inside is usually closed-cell foam. Water that gets past the liner sits against that foam. It doesn't dry quickly. It breeds odor and mold. A buyer who specs a bag that can't be cleaned properly will hear about it from the end user within weeks.
This guide covers cleaning methods by liner type. It also covers what water actually does to unsealed foam, how to dry a bag without wrecking the zipper, and which construction choices make a bag genuinely cleanable. If you're sourcing custom cooler bags, the liner decision isn't cosmetic. It decides the cleaning protocol. You'll see that clearly by the end.
Why Machine Washing Destroys Most Insulated Bags
A cooler bag is a layered system. The outer shell handles abrasion and appearance. The foam layer slows heat transfer. The inner liner holds the food or medical payload. Those layers are sewn or welded together at the edges. A washing machine agitates the whole stack. It flexes the seams. It forces water and detergent into the stitch holes.
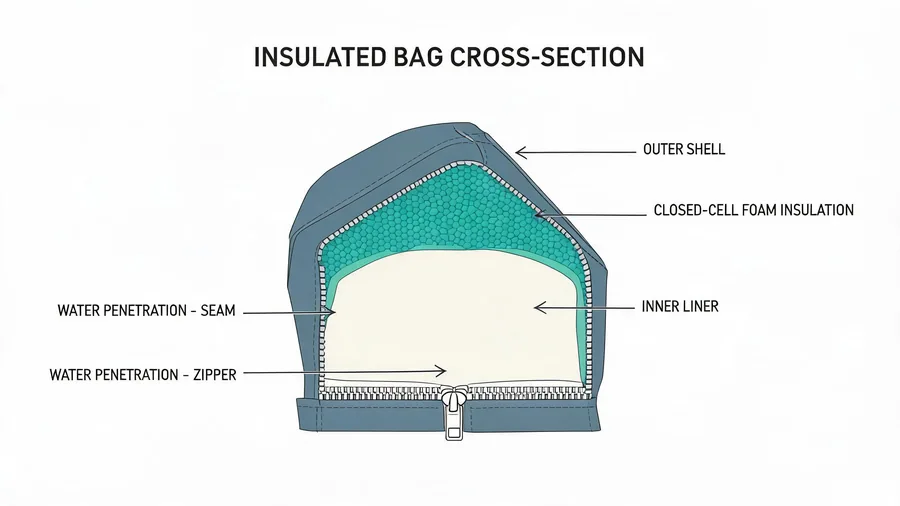
Closed-cell foam doesn't absorb water the way a sponge does. That's the good news. The bad news is that water still gets between the foam and the liner. Once it's in there, it has no easy way out. The bag looks dry on the outside. Inside the wall, moisture sits against the foam for days. That's where the sour smell comes from. That's also where mold starts.
Heat drying makes it worse. A dryer shrinks the outer fabric. It can melt thin liners. It can warp zipper coils. If the bag has a foil-faced reflective layer, the foil can crack and lose its radiant barrier function. None of this is covered by a typical warranty. The care label will say wipe clean. There's a reason for that.
How the Liner Decides the Cleaning Method
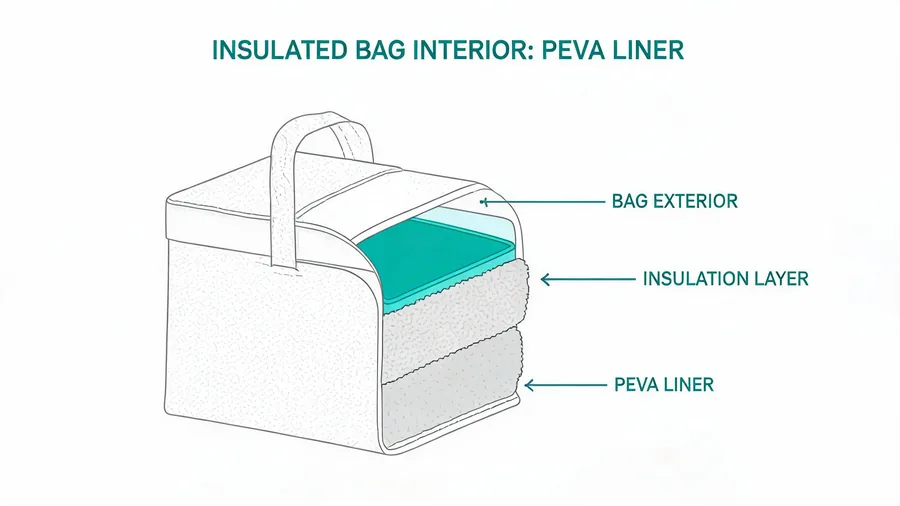
Not all insulated bags are equal. A bag with a PEVA or TPU film liner cleans differently from one with a woven polyester liner. A bag with a removable insert cleans differently from one with a fixed liner. The table below matches liner type to method. Use it as a starting point for your care guide or your spec sheet.
| Liner type | Cleaning method | What to avoid |
|---|---|---|
| PEVA or EVA film | Wipe with damp cloth and mild soap; rinse with clean damp cloth; air dry open | Machine washing, abrasive scrub pads, bleach, hot water |
| TPU laminated fabric | Wipe with damp cloth or rinse under low-pressure water if seams are welded; air dry fully | High-pressure spray, soaking, machine drying |
| Woven polyester with PU coating | Spot clean with soft brush and diluted soap; wipe dry immediately | Soaking, machine washing, scrubbing hard enough to break the coating |
| Aluminum PET film liner | Wipe gently with damp cloth; dry with soft cloth; avoid creasing | Any scrubbing, acidic cleaners, machine washing, crumpling |
| Removable waterproof insert | Remove insert; hand wash or wipe depending on insert material; dry separately | Reinstalling insert while bag interior is still damp |
PEVA is common in lunch bags and breast milk cooler bags. It's smooth and cheap. It wipes clean easily. But it scratches. Once scratched, residue hides in the grooves. TPU is tougher and more flexible. It costs more. It also survives more cleaning cycles before the surface breaks down. For medical or long-life food programs, TPU or a removable insert is usually the better call.
Step-by-Step Cleaning for a Fixed Liner
Start with an empty bag. Turn it upside down and shake out crumbs. Open every zipper. If the bag has a drainage eyelet, check that it isn't blocked. A reinforced eyelet lets water escape from a washable compartment. It only helps if it's clear.
Mix warm water with a small amount of mild dish soap. Don't use bleach. Don't use abrasive cleaners. Dampen a microfiber cloth in the mixture. Wring it out well. The cloth should be damp, not dripping. Wipe the interior from the top down. Pay attention to corners. Seams collect residue. Use a soft brush for stitched seams if the liner is woven. Don't scrub film liners with a brush.
Rinse with a second cloth dampened in clean water. Wipe again. Then dry the interior with a soft dry cloth. Leave the bag open in a well-ventilated area. Don't close it until the interior is completely dry to the touch. This can take several hours in humid weather. A bag that feels dry after ten minutes isn't dry inside the seams.
For odor, don't mask it with perfume. Remove the source. A diluted white vinegar solution can help on film liners. Test it on a small hidden area first. Rinse thoroughly. If the smell is inside the insulation, the bag is already compromised. No surface cleaning will fix that. This is why construction matters more than cleaning instructions.
Removable Inserts and Drainage Eyelets
A removable insert changes the cleaning story completely. The insert holds the wet or messy payload. You pull it out. You wash it separately. The insulated shell never touches the spill. This is the cleanest design for food transport and for medical sample carriers where cross-contamination is a real risk.
Inserts can be made from TPU, PEVA, or a coated fabric. Some are machine washable on a gentle cycle. Check the insert material first. The shell still needs wiping, but it rarely needs deep cleaning if the insert does its job. For programs where bags rotate between users, removable inserts are worth the extra unit cost. They cut cleaning labor and extend bag life.
Drainage eyelets serve a different purpose. They let water out of a washable compartment. A bag designed for wet use, like a fish cooler or a medical transport bag, may have a reinforced eyelet in the base. After rinsing the interior, water drains instead of pooling. The eyelet must be reinforced. A plain hole in fabric tears. A metal or plastic grommet spreads the load and protects the foam edge. If you spec a drainage eyelet, confirm the reinforcement method in the sample.
Drying and Mold Prevention
Mold needs three things: moisture, warmth, and a food source. A dirty cooler bag supplies all three. The food source is residue left in seams and corners. The warmth comes from the environment. The moisture comes from incomplete drying. Remove any one of these and mold can't take hold.
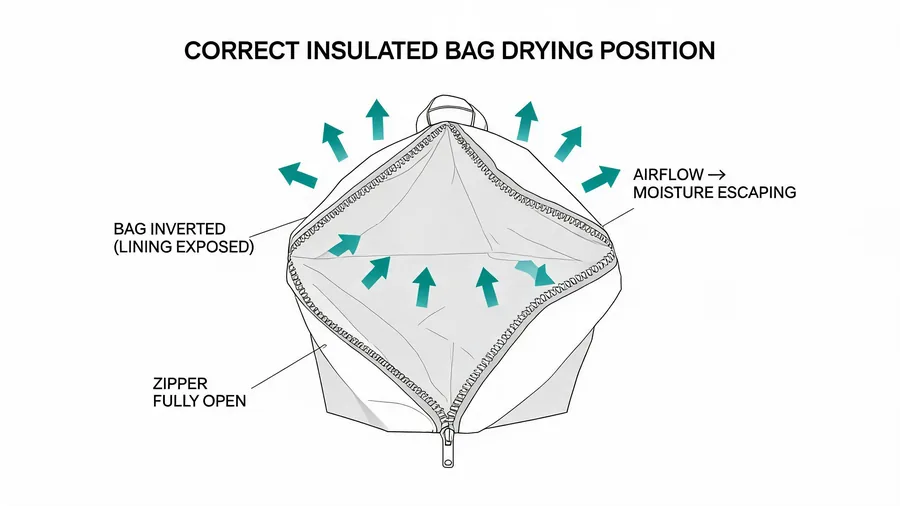
After cleaning, prop the bag open. Use a small towel or a clean bottle to hold the mouth open. Hang it if the design allows. Don't store a cooler bag in a closed cabinet while it's damp. Don't stack bags. Air needs to move through the interior. In a commercial kitchen or clinic, a simple drying rack near the cleaning station solves most mold complaints.
For long-term storage, clean the bag first. Dry it completely. Store it open or loosely closed in a dry area. A bag stored damp for two weeks will smell. A bag stored damp for two months may need to be replaced. The foam doesn't rot quickly, but the liner can delaminate and the odor can become permanent.
What to Spec When Cleanability Is a Requirement
If you're buying custom insulated bags for food delivery, catering, or medical transport, don't leave cleanability to chance. Put it in the specification. Here's what to ask for.
- Welded or sealed seams on the liner, not just stitched seams. Stitched seams leak through the needle holes.
- A smooth film liner with no exposed foam edges. Exposed foam absorbs moisture and residue.
- A removable insert when the payload is wet, greasy, or biologically sensitive.
- A drainage eyelet only when the bag is designed for rinsing. Otherwise it's a leak point.
- Tested zipper cycling so the closure survives repeated opening during cleaning and drying.
- A defined cleaning method in the care label that matches the actual liner material.
Ask the factory how the liner is attached. Ask for a sample and cut it open. Look at the edge. If you see foam exposed at the seam, water will get in. If the liner is welded into a sealed tub, the bag will survive far more cleaning cycles. This isn't a marketing claim. It's a construction decision you can see in the cut sample.
For programs that rotate bags between shifts or between patients, the removable insert design is almost always the right answer. It costs more per unit. It saves far more in replacement cost and cleaning labor. The same logic applies to insulated cooler backpacks used for meal delivery. A delivery driver can't deep-clean a backpack between stops. A removable liner or insert makes the daily wipe-down realistic.
We've seen buyers order a beautiful custom cooler bag with a printed outer shell and then discover the liner can't be cleaned after one week of use. The bag looked great in photos. It failed in the field. The fix was a new liner material and a new seam method. The outer design didn't change. The cleaning protocol did. That's the conversation to have before production, not after.
If you're evaluating suppliers, ask them to explain their liner attachment method. A factory that can't answer that question clearly is guessing. A factory that shows you a cross-section sample and explains the cleaning trade-offs knows what it's building. That's the difference between a promotional bag and a working bag.
For more on how cooler bag construction affects real-world performance, see our sourcing guides. If you need a bag that survives daily cleaning in a food-service or medical environment, tell us the payload and the cleaning protocol. We'll spec the liner accordingly. Start with the OEM process and we'll walk you through the options.
FAQ
Can I put an insulated lunch bag in the washing machine?
Most insulated lunch bags shouldn't go in a washing machine. The agitation forces water and detergent into the seam holes and between the liner and the foam. That trapped moisture causes odor and mold. The care label usually says wipe clean for this reason. A removable insert may be machine washable, but the insulated shell isn't.
How do I get a bad smell out of an insulated bag?
First remove the source. Wipe the interior with a damp cloth and mild soap, then rinse and dry completely. For film liners, a diluted white vinegar solution can help. Test it on a hidden area first. If the smell persists after the bag is fully dry, moisture has likely reached the insulation. Surface cleaning won't fix that.
How long does an insulated bag take to dry after cleaning?
It depends on the liner, the seams, and the humidity. A smooth film liner can feel dry within an hour. Stitched seams and woven liners take longer. Leave the bag open in a ventilated area until every part is dry to the touch. Closing a damp bag traps moisture inside the wall and starts mold growth.
What liner material is easiest to clean on a cooler bag?
TPU laminated fabric and PEVA film are the easiest fixed liners to wipe clean. TPU is tougher and survives more cleaning cycles. For wet or messy payloads, a removable waterproof insert is the easiest overall. You pull it out and wash it separately. The insulated shell stays dry.